Here you've learned what campaigns are and the interactions they contain. Learn how to create a campaign and how to add slides and interactive components to it. For the creation we provide you with a special area in the radiosphere studio: Campaigns. There you will find an overview of all your already created interactions, details about them and their results.
Create Campaign
Whether it's a contest, a survey, or an order to send greetings or favorite songs to the studio - you can place interactive components on your website and app for various reasons. All these interactions are part of a campaign and can be configured in the Campaigns section of the radiosphere Studio. This is located in the menu on the left under Campaigns. If you click there, you will get to the overview page of all your already created campaigns. To create a new campaign select the Create Campaign button in the upper right corner. Enter a name for your campaign and click Next.
Now you can choose from several templates that fit the intention of your campaign. Templates are created in advance for your organization to help you create a new campaign. If you don't know what templates are, you can read about them here. Click Create Campaign to confirm your selection. You can change the name you have previously set by clicking Back.
You will now be taken to the Campaign detail view. Under Actions and then Update Settings you can set the participation requirements, how often a person can participate and who can see the results. Click Update to save your settings or Cancel to cancel them.
To access and modify the Interactions slides, click on the Editor button in the top right corner. In the Campaign Editor, you can now edit all the slides, add new ones, assign or remove interactive components to them, delete existing slides, and set other participation specifics. Since you have selected a template in advance that matches the intention of your campaign, you already have ready-made slides and sequences available in the editor. If you still want to customize a slide, select it and click Edit to the right of Main to edit it.
If you want to add or delete interactive components it works the same way as for posts and pages. Don't know how to place components on your website and app yet? Then read this. Do you remember all the interactive components that allow you to request personal information? If not, they're explained here. And don't forget the Submit Button so that participants can submit their information to you!
When you are done editing the slide, click the Close button in the upper right corner to return to the slide overview. If your campaign consists of more than one slide, you have to define an order and connect them accordingly. Important: If you do not add another slide in the respective template, the existing slides are already connected. In this case you can skip the next section.
Set order and connect slides
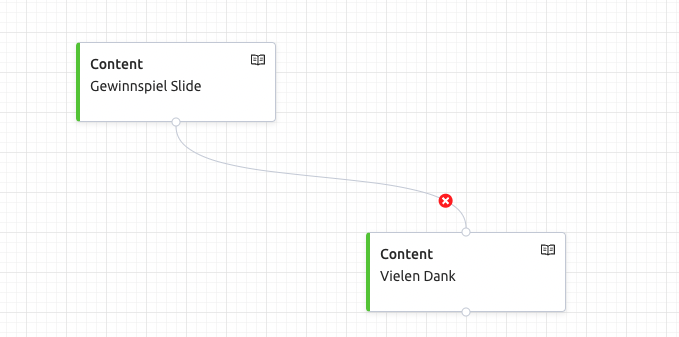
You put interactions in an order by arranging slides and connecting them. You can move slides freely on the checkered area. To do this, move the cursor to the corresponding slide and hold down the left mouse button. To connect several slides with each other, use lines. Click on the small white circle on the top or bottom horizontal slide and drag the line to the small white circle of the slide that should follow. If you want to delete a line, move the cursor over a line and click on the small red x.
To further narrow down the order you have to mark a slide as start and last slide. Interactive components that you place on the start slide will be displayed to the participants first. Mark the corresponding slide by selecting it and then clicking Mark Start Node. The Last Slide again marks the last slide that must be completed or reached for the participation to be considered successfully completed. Activate the last slide lever to mark it. Important: The last slide does not necessarily have to be an acknowledgement. In most cases, the participation is also considered effective if users cancel the participation, but have previously filled in all the necessary fields and successfully submitted their information. In this case, the thank-you message is not necessarily displayed to them. It therefore makes sense to mark the slide on which the last interactive component is placed as the last slide.
Once you are satisfied with your campaign, you can save and publish it. You can make your campaign visible on your website and app only after you have approved it. To do this, click on Actions in the campaign details view and then on Enable.
Publish campaign on your website and app
Open the content page where you want to place your campaign in the radiosphere Studio Editor. Click on the Add button in the top bar next to the Select button. Select the area marked in blue where you want to place the interactive components of your campaign. Once you have selected the appropriate area, a new window will open with all available components. Search for Interaction in the search bar at the top and click Add.
On the left side of the preview you will see a blue dotted line. On the right, under Attributes, you can search for your campaign in the Interaction field. After you have selected the appropriate campaign, the name will appear in the highlighted field. Save and publish the page so that users can see your campaign. Important: The interactions are not shown in the preview, but only on the website and app.